
What you’ll need:
›› 3 inch metal ring
›› 1 ball of craft cord (minimum 40 yards length)
›› 9 inch flower pot
›› Scissors
›› Lighter (optional)
1. Measure and cut 8 lengths of craft cord each about 15 feet long. This doesn’t have to be exact so I usually measure by using my arm span three times.
2. Bring all 8 cords together and fold them in half finding the middle point for the entire bunch. Push that middle fold through the metal ring and bring all of the cord ends through the loop made by the middle fold creating a lark’s head knot. Pull cords tight securing them to the ring. It helps to pull the cords individually to tighten them around the ring. You should now have 16 cords hanging from the ring to about the same length.
3. Hang the ring from a high point, a hook on the wall, a hanging basket stand, even a door hinge. Hanging the piece while you work allows gravity to help you keep things even.
4. Divide the cords into 4 groups of 4 being mindful of how they naturally fall from the ring to keep cords from becoming twisted.
5. Approximately 12 inches from the ring tie 4 of the cords together in a simple overhand knot. Pull tight. Using this first knot as reference, tie the other groups of cords to make 4 total knots of about the same distance from the ring.
6. Approximately 12 inches from the first set of knots, take two cords from two side-by-side knots and make an overhand knot with this new set of four. In the same way, work 3 more knots around your project.
7. Approximately 8 inches from the second set of knots, take two cords from two side-by-side knots and make an overhand knot with this new set of four. In the same way, work 3 more knots around your project.
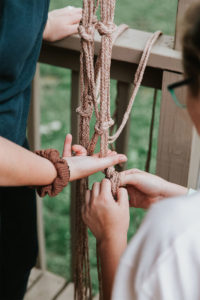
8. Approximately 4 inches from the third set of knots, take two cords from two side-by-side knots and make an overhand knot with this new set of four. In the same way, work 3 more knots around your project.
9. At this point, your nine inch pot should nestle inside the cords quite snuggly. If you feel uncertain that the pot will be supported with the bottom of the plant holder open, you can close up the bottom by bringing all 16 cords together again and making a large overhand knot about 2 inches from the fourth set of knots.
10. Trim the remaining cord to your desired length. If using nylon craft cord, you can use a lighter to melt the ends of the cord to keep them from fraying, or simply tie individual overhand knots at the end of each cord. Alternatively, you can manually fray the ends by separating the strings of each cord to make a fluffy fringe for the bottom of your plant hanger.
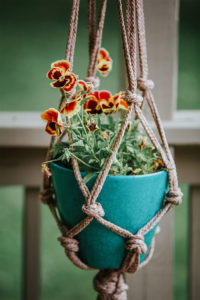
11. Fill the pot! You can plant a flower in your pot or use craft foam inside the pot to “plant” school supplies. Attach post-its and markers and sticker sheets to skewers with tape and insert them into the craft foam.
This particular pattern uses the familiar overhand knot, but the more intricate macrame patterns that you see in home decor are just as easy to master. Search online to learn to do the square knot, the spiral knot, the half hitch knot, and many others. Feel free to adjust the lengths between knots to fit your hanging space and your flower pot size. And, if you really want to get fancy, you can add beads and bangles! In macrame, you are only limited by your imagination!