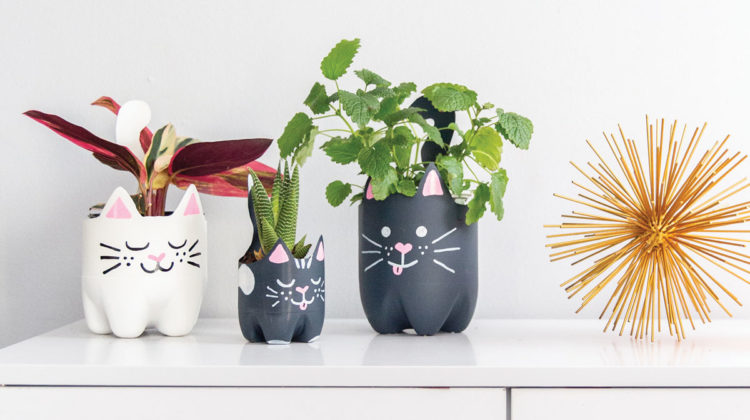
If you’re a cat-lover that also needs more houseplants on the windowsill, look no further! These cute DIY planters are easy to make and look great in your home. Not only can you and your kids customize these planters to look like your favorite feline, but they are also a great way to reduce waste by up-cycling old soda bottles! Once you follow the first steps in the instructions, you can hand the planter over to your kids to let them draw a face or color the cat planter in any way they choose. If you do have a cat in the house, make sure to use plants that are safe and non-toxic for your pet!
SUPPLIES:
›› soda bottle (can be any size – I went with 2 liter and 24 oz)
›› spray paint
›› Sharpie marker
›› paint pens
›› scissors
›› Xacto knife
›› cat-safe house plant
›› gravel/soil
›› optional: acrylic paint
›› optional: sandpaper
INSTRUCTIONS:
›› Peel the label off of your soda bottles, then draw the outline of your cat with a sharpie.
›› Cut out your planter using an Xacto and/or scissors (whatever is easiest for you). I recommend cutting below the sharpie line since it might show through the paint. Make sure to cut a small hole out of the bottom of the planter for drainage.
›› Once you have the shape cut out, check to make sure you didn’t leave any sharp edges. You can sandpaper the edges to make them smooth.
›› Use the spray paint to paint a base coat on your planter (may take two coats). If your bottle was clear, you should only have to paint the outside.
›› Now that your planter is prepped, children can draw on their own faces with paint pens, or even paint more patterns using acrylic paints.
›› When your planter is finished and dry, pour a bit of gravel at the bottom of the planter before adding your plant and any extra soil the plant may need.